
Care & Handling of Surgical Instruments
In order to maintain the value of high quality and amazing hospitime surgical instruments, maintenance, upkeep, care and preparation play an essential and focal part. This handout aims to clarify basic questions about instruments care which prolonged the life of the instruments by many years.
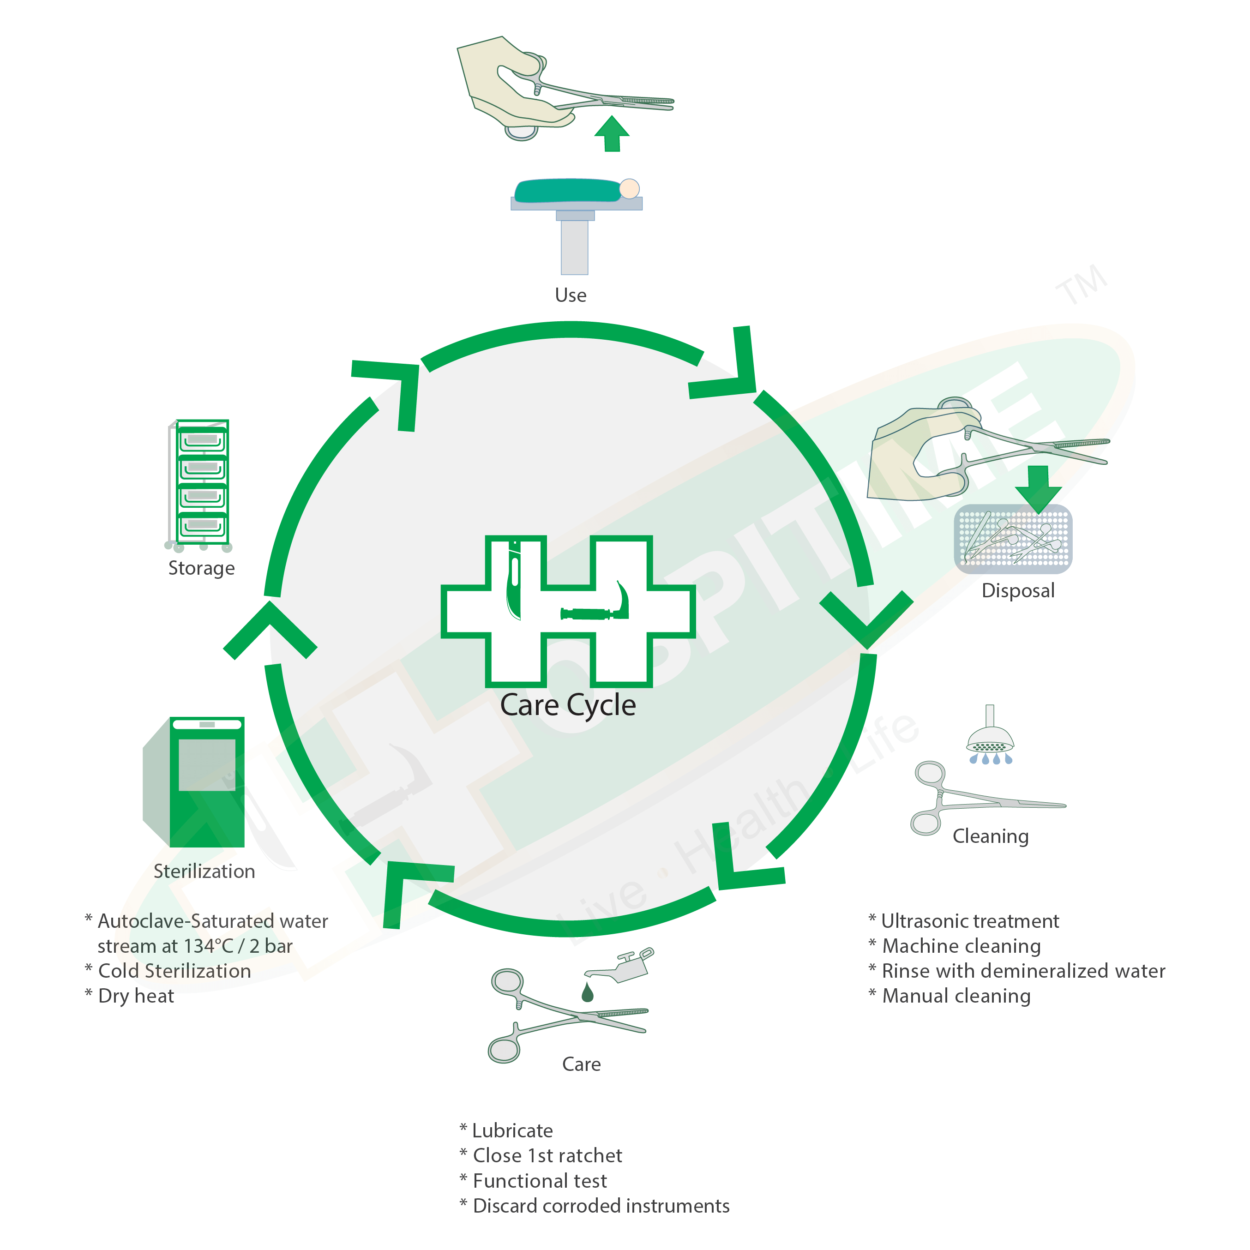
Clean and lubricate the brand new Hospitime surgical instruments before the 1st sterilization. After use, distinct, clean, lubricate and sterilize the instruments as soon as possible.
Disinfect chemothermally, thermally or by immersing into a combined disinfecting & cleaning solution. Delicate instruments can be cleaned by ultrasonic treatment.
Rinse thoroughly and carefully after cleaning if possible, use demineralised water. Dry sufficiently after rinsing.
Treat the instruments with joints, ratchets or threads with lubricating agent based on para n oil. We strongly recommend to follow the sterilization instructions of the manufacturer.
Prior to sterilization, only close the 1st ratchet on the instruments. Normally, autoclaving is performed with saturated water stream at 134°C.
When instruments are hot-air sterilized, the temperature should be between 180°C and 200°C. Corroded instruments should be discarded immediately.
Steps
Ensure that the product is only used for its intended purpose by a suitably trained physician or surgeon. Handle all instruments gently. Never overstrain, drop or misuse
Intended Use
Manual surgical instruments are intended for use in multiple surgical specialties to perform basic surgical tasks such as cutting, grasping, clamping, dissecting, probing, retracting, draining aspirating, suturing or ligating.
Indications For Use
The instruments are intended to scrape, cut, grasp, hold, remove, or manipulate tissue or structures. They include instrument trays and suction devices designed to evacuate gas, uid, tissue or other foreign materials.
It is the responsibility of the surgical team to select the appropriate instrument for each case.
All Single use, disposable, instruments can be disposed of with your other clinical waste.
Wet and Dry Disposal
“Wet disposal” and “dry disposal” are basically different cleaning procedures.
- Dry disposal:
Following use in the OR, the instruments are deposited for return to the CSSD in dry condition, without applying a disinfectant or immersing them in a disinfecting solution. So for dry disposal, the instruments are not to be cleaned with or placed in a physiological saline solution.
If pre-cleaning is necessary after use, the instruments must be rinsed or wiped clean immediately.
We recommend using the “dry disposal” method for machine cleaning. - Wet disposal:
Immediately after use, the instruments are to be placed into a non-fixating cleaning and disinfecting solution.
Please observe the instructions provided by the manufacturer of your disinfectant.
Detergents and Disinfectants & Temperature Ranges
- Be sure to use commercially available detergents and disinfectants that have been approved for use in each case.
- Always observe the recommended concentrations, exposure times and temperatures.
- Make sure that no residues are left on the instruments after cleaning.
- Use demineralized water for the final rinse.
| Stainless Steel Instruments | Aluminum Instruments | |
| Cleaning/disinfection | acid / neutral / alkaline with / without the addition of tensides |
neutral / mildly alkaline with / without the addition of tensides |
| Allowable temperature for chemical disinfection | max. 60°C / 140°F | max. 60°C / 140°F |
| Allowable temperature for thermal methods | max. 93°C / 199°F | max. 93°C / 199°F |
| Drying | at max. 125°C / 257°F |
Use of neutral-pH treating agents recommended!
Alkaline detergents and/or acid neutralizers are capable of causing discoloration – usually grayish brown – on metal-coated (e. g. TiNi) surfaces even after a short time. According to the current state of research, this does not compromise the proper functioning of the instruments. Nonetheless, using neutral-pH agents is the best option to ensure gentle treatment of your instrument surfaces.
Media containing chlorides attack surfaces!
Water with a chloride content exceeding 120 mg/l can attack the surfaces of your instruments during cleaning. If you use water with a chloride content of less than 120 mg/l, you still need to take the concentration effect during drying into account as well.
Ensure reliable drying!
Reliable drying is an essential factor for successful sterilization!
Cleaning removes dirt, debris and biological material from surgical instruments. You can clean surgical instruments manually or mechanically using water and detergents or an enzymatic cleaner. Thoroughly clean your instruments, because debris that remains on instruments can interfere with further disinfection/sterilisation or corrupt research data. Cleaning is the first step toward sterilisation and sometimes is all that is required.
Cleaning
The first step in properly cleaning your surgical instruments is to rinse off all blood, bodily fluids and tissue immediately after use. Dried soils may damage the instrument surface and make cleaning more difficult. Rinse your instruments in cool water. Hot water can cause proteinous substances to coagulate. If desired, soak your surgical instruments in cool water with an enzymatic detergent. The detergent helps to dissolve the proteins and break down oils. Then, the instruments may be cleaned manually or mechanically in a washer or ultrasonic bath.
Manual Cleaning
If a mechanical cleaning method is unavailable, manual cleaning may be necessary. Likewise, if instruments are easily damaged, complex (requiring disassembly) or have small lumens, they may need to be cleaned manually.
When cleaning your instruments manually, wear heavy-duty rubber gloves, a plastic apron, eye protection and a mask. Use only neutral pH detergents. If your instruments are not rinsed properly, low pH detergents may break down the protective surface of stainless steel instruments and cause black staining. Likewise, alkaline detergents may leave surface deposits that cause a brown stain and interfere with the smooth operation of the instrument.
Use soft plastic cleaning brushes to scrub the instruments. Do not use steel wool, wire brushes or other abrasive materials that could scratch the finish or dull your instruments. Hold the instruments below the surface of the water when you scrub them to avoid splattering contaminants. Be sure to brush out all crevices, teeth and grooves. Rinse each instrument thoroughly under running water. Open and close hinged instruments like scissors, hemostats and needle holders under running water to thoroughly rinse detergent from the hinges.
Visually inspect your instruments to ensure they are free of stains and tissue. Check each instrument for proper function and condition. Scissors blades should be tight and should open and close smoothly. Forceps and tweezer tips should be properly aligned. Like the scissors, the hemostats should not be loose. Verify that they lock and unlock easily. Close the needle holders and hold them up to the light. Light coming through the tip indicates that the jaws are worn. Knives and cutting blades should be sharp and free of nicks and chips. After a visual inspection, dry the instruments with a soft cloth. This minimizes the risk of corrosion and the formation of water spots. Use a spray lubricant in the hinges to improve the function of the instrument.
Mechanical Cleaning
Typically, a washing machine runs through several cycles. A cold water rinse removes debris. Then, a hot water bath and rinse cycle is followed by a blow dry with hot air. Some washers are also disinfectors. These units use 100°C water in the hot water cycle. Follow the manufacturer’s instructions when using a mechanical washer. Be sure to lubricate hinged instruments after the last rinse cycle and prior to sterilisation.
Ultrasonic cleaning is the most effective cleaning method, because of its cavitation. As the sound waves vibrate through the cleaning solution, they create microscopic bubbles, which grow as the pressure in the unit changes. Eventually the bubbles implode. The bursting bubbles effectively dislodge debris, even in the most difficult to reach places. A neutral pH detergent improves the effectiveness of the cleaner, because it increases the number of bubbles.
Before you begin, fill the ultrasonic cleaner with deionised water and detergent according to the manufacturer’s directions. Run the cleaner for several minutes to allow the temperature to equilibrate and to remove any gases from the solution.
Separate instruments by metal type and process them in batches. For example, do not mix chrome plated and stainless steel instruments in the same cleaning cycle. Fully submerge all instruments. Place hinged instruments into the solution in an open position. Make sure that any sharp instruments do not touch other instruments. Allow the instruments to process for 5–10 minutes before removing them from the ultrasonic bath and rinsing thoroughly. As before, visually inspect each instrument, dry it with a soft cloth and lubricate any hinges.
Disinfection
Both thermal and chemical methods are available for HLD. As a general rule, surgical instruments are not susceptible to heat, making boiling the preferred method for disinfecting. Boiling instruments in 100°C water for at least one minute kills all microorganisms, except for a few bacterial spores. Boiling does NOT sterilise equipment.
Bring the boiler to a rolling boil. Submerge open instruments in the boiling water. When the water returns to the boiling point, turn the heat down to a gentle boil. A rolling boil could damage instruments as they bounce around in the boiler. After one minute, remove the instruments from the water using a set of disinfected tongs. Allow the instruments to dry and lubricate the hinges. Do NOT leave boiled instruments in the water as it cools, because they could be re-contaminated. Discard the water when you finish disinfecting your instruments.
To eliminate lime buildup on boiled instruments, use distilled water for boiling or add a small amount of white vinegar to the boiler before you process your instruments.
Chemical disinfection can be used when instruments will be damaged by heat. Some chemicals that may be considered include glutaraldehyde 2% for 20 minutes, hydrogen peroxide 6%–7.5% for 20–30 minutes, peracetic acid 0.2–0.35% for 5 minutes and ortho-phthalaldehyde (OPA) for 5–12 minutes.
Inspection after Cleaning
- Following cleaning, the instruments must be macroscopically clean, i.e. free from visible dirt or deposits.
- Instruments with stains or spots must be withdrawn from service at once and given special treatment.
- All movable parts, working tips and (scissor) blades should be inspected with particular care.
- If damage or malfunction is detected, the instrument must also be withdrawn from service immediately.
“Care” means treating the instruments with instrument oil or milk (white oil-in-water emulsion). Instruments with joints or box locks (scissors, forceps, clamps, etc.) or with metal sliding surfaces (rib shears, punches, etc.) must be treated with steam-sterilizable care agents based on paraffin oil. The paraffin oil must comply with the pharmacopoeia in force at the time and must be physiologically safe as specified in the German Pharmacopoeia (“Deutsches Arzneibuch”, 10th edition (DAB 10)”, “European Pharmacopoeia (Ph. Eur.)” or “United States Pharmacopoeia (USP)”.
Care agents prevent metal-on-metal friction, thus ensuring the easy movement of your instruments. Laser-marked products can be adver- sely affected when using basic cleaning agents containing phosphoric or hydrofluoric acid because the marking may fade away and the coding function get impaired or lost as a result.
As a rule, surgical instruments must be subjected to regular care, which means each time before a functional test is carried out. At the same time, it is important to prevent “gumming” of the joints due to an accumulative effect, especially in instruments that are continuously in use.
Sterilisation kills all microorganisms and spores. Autoclaving (saturated steam under high pressure) is the most common method for sterilising surgical instruments, however, dry heat and chemical sterilants (ethylene gas, hydrogen peroxide gas plasma, etc.) can also be used.
Autoclave
Prior to autoclaving, clean the instruments and lubricate all hinged instruments with a surgical instrument lubricant. Do not use WD-40® or other industrial lubricants. Always autoclave instruments in an open position. Locking an instrument prevents the steam from reaching all the surfaces. The heat also causes the metal to expand, which can crack the hinges of locked instruments. Never overload the autoclave chamber. Instruments can be placed in sterilisation trays or wrapped in paper or muslin before autoclaving. This helps to prevent contamination of the instruments after sterilisation.
Arrange the instruments, sterilisation trays or packs in the autoclave without stacking them. The steam must circulate freely inside the autoclave. Follow the manufacturer’s directions for adjusting the time, temperature and pressure of the autoclave cycle. Process the instruments as follows:
Unwrapped instruments at 121°C for 20 minutes at 15 PSI above atmospheric pressure or at 134°C for 3–4 minutes at 30 PSI above atmospheric pressure
Wrapped instruments at 121°C for 30 minutes at 15 PSI above atmospheric pressure or at 134°C for 15 minutes at 30 PSI above atmospheric pressure
When the autoclaving cycle is complete and the pressure reaches zero, open the door a centimeter or two to allow the steam to escape. Run the drying cycle as recommended by the autoclave manufacturer until all the instruments are dry. It should take about 30 minutes. Using sterile tongs, remove all the instruments, trays and packages. Allow them to cool to room temperature before storing.
Unwrapped items must be used immediately or may be stored in covered, dry, sterile trays for up to a week. Store wrapped packages in a warm, dry, closed cabinet. Instruments remain sterile as long as the wrap is dry and intact.
Dry Heat
Dry heat may also be used to sterilise surgical instruments. Instruments can be wrapped in aluminum foil or placed in sterilisation trays before putting them in the oven. Refer to the manufacturer’s directions to heat the oven. Instruments can be heated to any of the following to be considered sterilised:
- 180°C for 30 minutes
- 170°C for 1 hour
- 160°C for 2 hours
- 149°C for 2.5 hours
- 141°C for 3 hours
Allow the instruments to cool to room temperature inside the oven and store them as described above.
Cold Sterilisation
Soaking surgical instruments in most cold sterilants requires 10 hours to sterilise them. This can be detrimental to fine instruments. If disinfection is required (and not sterilisation) a 10–90 minute soak in a cold sterilant may be all that is required. When using instruments with tungsten carbide inserts (needle holders, scissors, forceps), avoid using solutions with benzyl ammonium chloride.
-
Sterile, packaged instruments should be stored in a designated, limited access area that is well ventilated and provides protection from dust, moisture, insects, vermin, and temperature/humidity extremes.
-
Sterile instrument packages should be carefully examined prior to opening to ensure that package integrity has not been compromised.
Note: Maintenance of sterile package integrity is generally event related. If a sterile wrap is torn, perforated, shows any evidence of tampering or has been exposed to moisture, the instrument set must be cleaned, repackaged and sterilized.
Note: If there is any evidence that the lid seal or lters on a sterilization container have been opened or compromised, the sterile lters must be replaced and the instrument set resterilized.
NOTE:
- Always use the proper sterilization/cleaning technique to render the instrument in required condition for use.
- For instruments with Tungsten Carbide inserts (Needle Holders, Scissors, Tissue Forceps), we do not recommend use of solutions containing Benzyl Ammonium Chloride which will destroy the Tungsten Carbide Inserts.
http://www.wikihow.com/Sterilize-Medical-Instruments